
My experience with film and digital cameras over the last five years or so culminated recently in the revelation that it doesn’t matter so much whether I’m hunting for beauty with film or pixels.
What’s far more valuable to me is the hunting itself, plus the vintage lenses I love to use.
This post is the extension of that – How I use manual vintage lenses with a DSLR.
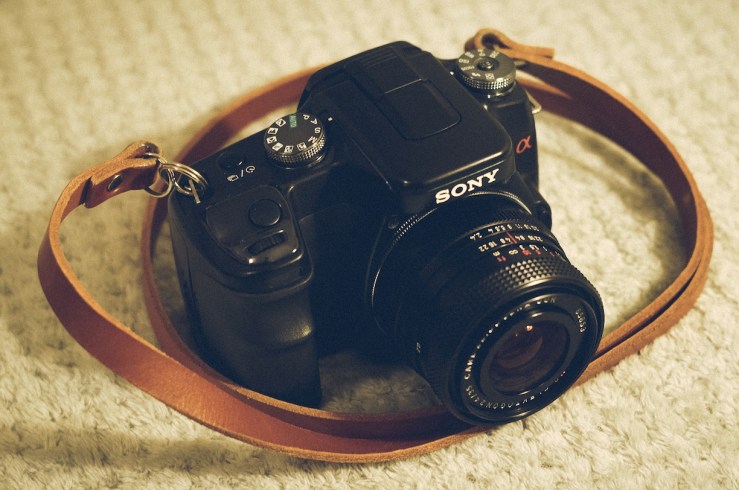
For the purpose of the following explanations, let’s go with my Sony a100 DLSR, plus a Carl Zeiss Jena DDR Flektogon Flektogon 35mm f/2.4 M42 lens.
Other lenses – especially other M42 mount lenses – follow a very similar process in use.
Initial set up
First, I ensure the M42 > Sony adapter is on the camera, then screw in the lens. I set it to minimum focus, as most of my photography tends to be up close.
The camera I try to set as neutral as possible.
I use ISO400, which gives a little more noise/grain in the final image than ISO200 or ISO100, a personal preference, and a leaning towards the grain I love with shooting film. I don’t like digital to look too clean and clinical.
Also, a higher ISO means in lower light I can shoot at smaller apertures without resorting to too slow a shutter speed and the increased potential of blurred shots.
I shoot RAW files at the maximum size (10MP with the a100), set the colour to “standard” and all the other colour, contrast, saturation and sharpness settings to neutral/zero.
For metering I go with centre weighted, which I’m most used to from shooting film cameras.
White balance is usually daylight as I only really shoot in daylight and this seems to give most consistently realistic colours, to my eye. I’ve found auto white balance can be a bit erratic with the a100. I turn off any other “enhancements” like noise reduction.
These settings I adjusted when I first got the camera, and now don’t need to touch them.
It’s not something I have to (or feel the need to) fiddle with every time I pick it up.
I want the camera to be as simple to use as possible.
So after this initial set up, the only adjustments I make shot to shot predominantly involve just two settings – the aperture and the focus.
Talking of focus, it’s worth mentioning here to check your diopter adjustment. It can make a huge difference to how easy (or not!) it is to focus with a manual focus lens on a DSLR.
Look through the camera towards a bright light source with the lens set to infinity (or even better, no lens). Note how sharp and clear the central AF rectangle in the VF is.
Adjust the diopter up and down until you get the clearest picture. It should be quite obvious when you have the right setting, as moving a couple of notches either side will make the image significantly more fuzzy.
If this is a few notches out it will be very difficult to focus accurately.
Initial set up covered, let’s move on to using the camera shot by shot.
With film cameras, whilst sometimes I like to go meterless and Sunny 11, 95% of the time I use Aperture Priority mode (Av) mode. It’s the same with the a100, though it’s marked A on the mode dial, rather than Av.

My default aperture is f/5.6 with a lens like the Flektogon, and indeed any reasonably fast lens.
This gives me, most of the time, the kind of depth of field I like, plus as a rule the lens is likely to be performing better (sharpness, colour, contrast) two or three stops down than at its maximum aperture.
The viewfinder (VF) on the a100 is bright enough in good lighting to be able to focus at f/5.6. If I need to be more precise with focusing I will open the aperture to the maximum of f/2.4, focus, then stop down to the required aperture.
To make stopping down easier, use the Auto/Manual (A/M) switch found on most M42 lenses.
If the aperture you want makes the VF too dark to focus, and/or you don’t want to be stopping up and down a lot, make use of the little switch like this –
Set your chosen aperture, ensure the switch is on A. Look into the lens and you’ll see the aperture wide open, ie you can’t see the blades.
Compose, focus, then when you’re ready, flick the switch to M, so the blades close, the camera can automatically set its shutter speed, then shoot.
Switch back to A, ready for the next shot.
Shot to shot, step by step, this is my process –
- Find something interesting to capture.
- Compose and focus.
- Adjust aperture, if needed, to adjust depth of field, either manually stopping down or using the A/M switch.
- Half press the shutter button so the camera’s meter activates and shows the shutter speed.
- If shutter speed is ok (not maxing out, or not too slow a for hand held shot), press the shutter button all the way to take the photograph.
I do tend to check the screen most shots afterwards, for one main reason.
Whilst with fully auto lenses like the excellent Minolta AF series, the a100 seems to meter very accurately, with manual vintage lenses it tends to slightly underexpose.
I have found by setting the exposure compensation (the button is marked AV +/-) to +0.3 as a base setting, most shots come out well.
As with any photography, when the light is tricky, you may have to compensate.
With digital we have the blessing of the screen to check, then adjust the exposure compensation a little if needed, and retake the shot.
If you’re really concerned about precise exposure (I’m generally not!) then use the Exposure Bracketing mode most DLSRs have to take three shots then pick the best exposed afterwards. The a100 cleverly shows the three exposures it will take on the sliding scale in the VF and you can still use this in conjunction with exposure compensation too if you wish.
Personally, I’d rather get it right with trail and error using the Exposure Comp feature than have three of every photograph to look through at home.
And that about it.
Hopefully, as you can see, after my modest initial set up, using the a100 with M42 lenses is very similar to using my Contax or Canon EOS film cameras with the very same lenses.
Set to Aperture Priority mode, compose, focus, adjust aperture, half press to check shutter speed, shoot. Repeat as required.
For me this provides the ideal balance between the pleasure of handling and using vintage lenses, yet the camera being invisible enough and the process simple enough, to not get in the way of me enjoying the exploring and the picture taking.
Hopefully this has encouraged you to try a DSLR with manual vintage lenses, or if you have already, how it can be reduced to a refreshing simple process, despite the many buttons, modes and switches at our disposal with these devices.
Do you shoot vintage lenses on a DSLR?
Let us know your experiences in the comments below.
Thanks for reading. Please share this post with others you feel will enjoy it too.


Hi Dan, I really enjoy your blog … as I do with this article. I myself use an Olympus E-M1 with vintage lenses, when shooting digital. It allows focus peaking, which makes manual focussing a lot easier. Thanks for blogging 😉
Hi Reinhold, thanks so much for your encouraging comments. I’m posting more consistently lately and enjoying it.
Though this post is about a DSLR, I’ve not had it long. Most of my digital work in the last three years or so has been with my NEX, which like your Olympus has the invaluable focus peaking function.
The NEX is amazing, and I continue to use it, I just missed the feel of a “proper” shaped camera, with a viewfinder, so explored DSLR options and settled on the a100.
Outstanding experience report. I’ve been futzing with a 55/2 Super-Tak on my Canon EOS A2e film camera and haven’t entirely figured it out yet, but I did pick up a couple tips here I can adapt.
Thanks Jim. I like that word “futzing”, not heard that before!
The EOS bodies are unbelievably adaptable. Though I love the Sony Alpha, and am not short of options with fantastic lenses in M42 and Minolta AF mounts, I think it’s inevitable at some point I’ll try a digital EOS.
I often come across different lenses and virtually without fail they can be adapted to EOS.
Today I stumbled over a beautiful looking Voigtlander Color Ultron 50/1.8 (what a name too!) in “Rollei QBM” mount.
A quick search later, and yep, there’s a Rollei QBM to EOS adapter… They made some very special sounding lenses in that mount…
I’ve used “futz” for as long as I can remember but I suppose it’s probably a substitute for the other four-letter f word.
[…] How I Shoot Manual Vintage Lenses With A DSLR […]
[…] How I Shoot Manual Vintage Lenses With A DSLR […]
Just saw this article. I have a Pentax k5 that I set to Av. I’m using a Nikon f lens thru an adapter. I focus at max aperture 1.4. I take a pic and the exposure looks good. I stop down to 5.6 for example and I can see that the meter is changing the shutter speed, but the pic looks underexposed, as if the meter is not really working correctly. Am I missing something?
Ben, thanks for your comments.
My first thought is although the meter is changing and showing you what exposure is correct for the scene, perhaps it’s not actually then changing the shutter speed?
These days I mostly shoot with A series lenses or newer on my Pentax DLSRs, as I know they allow the camera to adjust the aperture and shutter speed without any manual intervention.
For older manual lenses, you usually need to manual intervene to set the camera’s shutter speed to what the meter is recommending.
Read up about the Pentax green button, usually this is used to actually set the shutter speed to what the meter is recommending – it doesn’t do it automatically as you might expect, even though the meter readout looks correct.
Try this article, especially point 1.
https://www.pentaxforums.com/articles/photo-articles/pentax-green-button-guide.html
Also, even once you’ve figures out this part, be prepared to use the exposure compensation button pretty heavily.
Even on my Pentax DLSRs with A series lenses and newer, I still need to use exposure comp up to a stop either way to get the exposure right.
Let us know how you get on.