
Preset aperture lenses are different from standard lenses with a single aperture ring and set click stops.
Here’s how they differ, some of the reasons I enjoy using them, and why you should try them too.

First, how they work.
There are different variations, but the feature common to them all is you preset not the exact aperture, but the minimum aperture the lens will stop down to.
There is either via a separate aperture ring, or the main aperture ring is spring loaded and pushes in or out then rotates. This ring dictates the smallest aperture the lens will be at when the main aperture ring is turned all the way in the opposite direction from being wide open.
Here are examples of three minor variants.
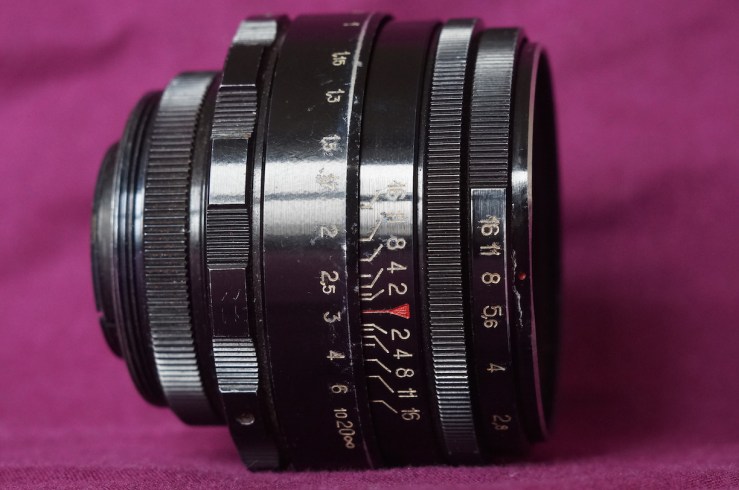
With the Helios 44-2, the outermost part of the lens with the red dot is fixed. The next ring in, with the numbers on, clicks to the various standard stops. Above you can see it’s at f/8. The next knurled ring in adjusts freely between the maximum aperture (f/2) and the preset minimum aperture (f/8 in the picture above).
So you can adjust it as precisely as you wish, without needing to be at whole click stops like f/4, f/5.6 and so on. More on why you might want this later on.
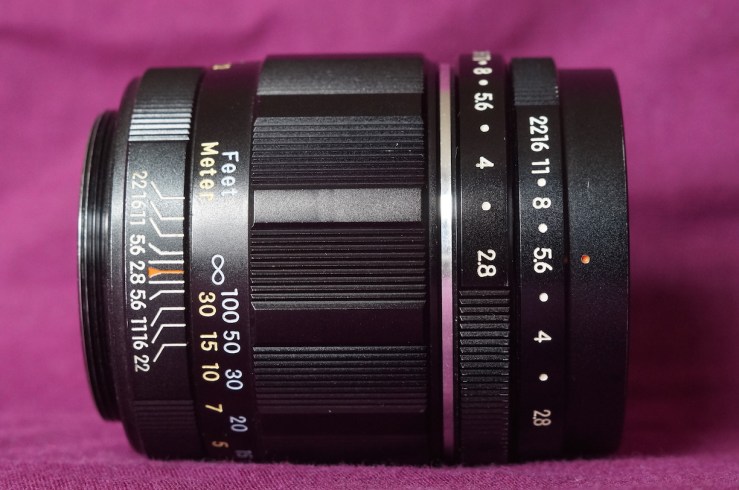
The Takumar is similar, but slightly more clear in its design. Again the outermost part with the red dot is fixed. The next ring where you can see all of the numbers sets the minimum aperture, and moves in clicks (and half clicks where you see the white dots). Then the next ring in, also numbered, moves freely between the maximum f/2 and minimum, in this case f/5.6.
The Takumar is a little easier to use for those used to setting an aperture number, as you still line up a specific aperture number with the red dot if you wish to.
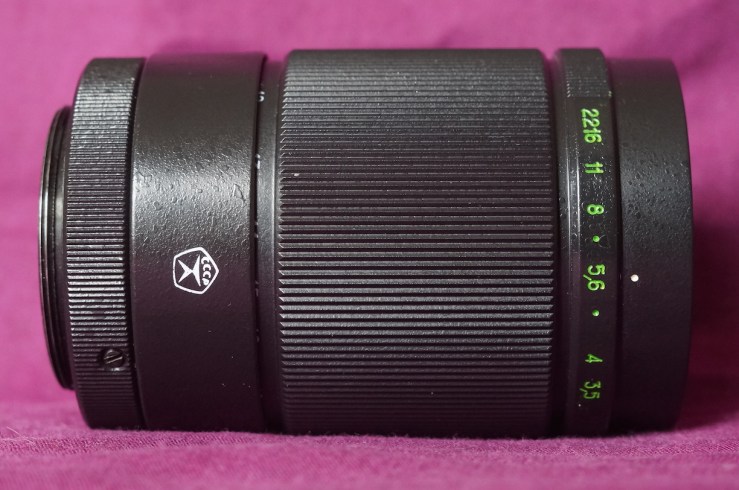
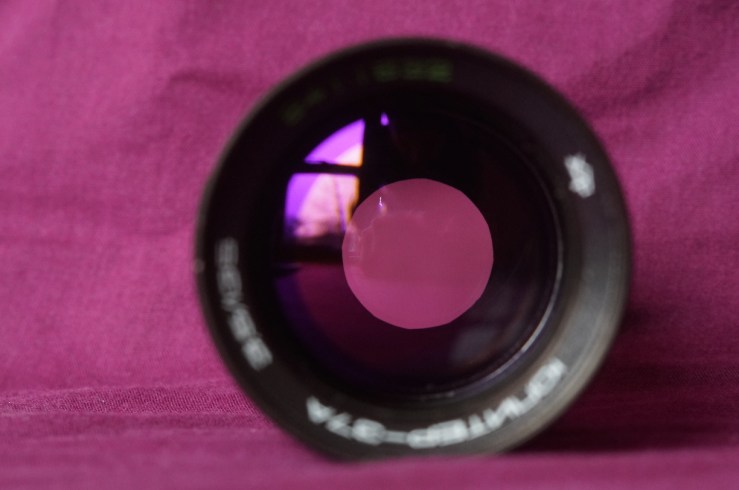
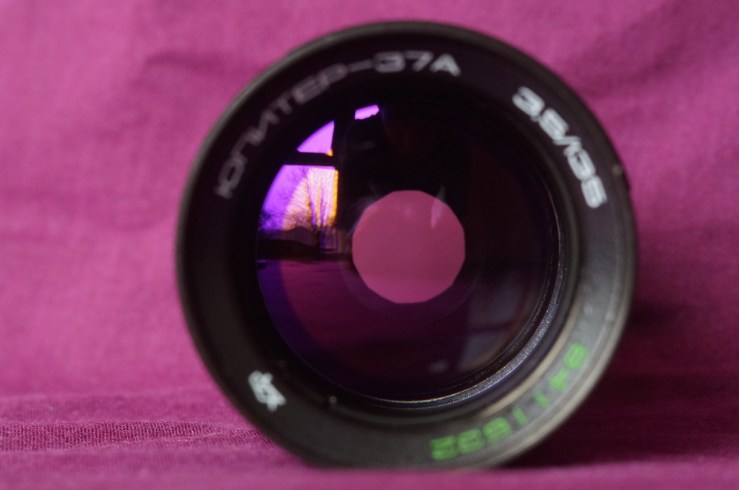
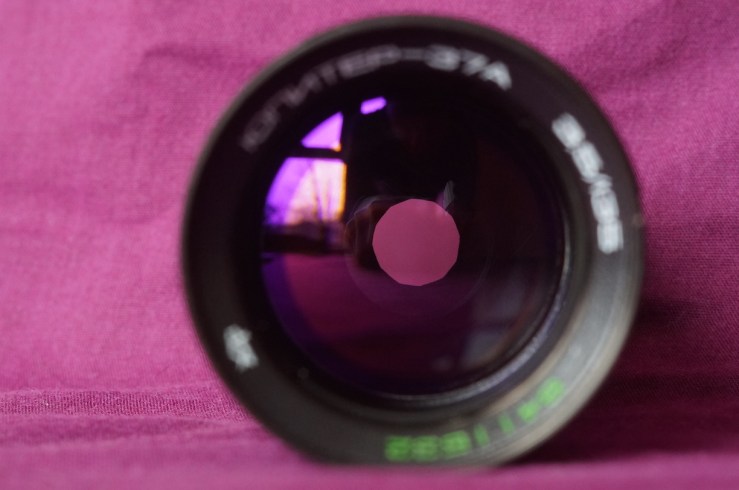
The Jupiter-37A has just one aperture ring. Again the outer part with the white dot is fixed. To set the minimum aperture, you push the numbered ring in so its up against the large knurled focus ring, then turn it to the aperture required, then release the ring. It’s spring loaded so it pops back to the rest position as above.
Then the same ring rotates freely between the maximum aperture (f/3.5) and preset minimum aperture (f/5.6 in the picture above).
In practice, choosing and setting the aperture works as follows.
Say you want to shoot a lens at f/8. So you set the preset aperture ring to f/8, then open the lens wide open.
At the lens’s maximum aperture (wide open, so when you look into the lens from the front you can’t see the aperture blades at all), you have maximum light entering, so it’s easiest to compose and focus with the camera.
When you’ve focused, simply turn the main aperture ring all the way down until it won’t turn anymore. Then you know you’ll be at your preset aperture (f/8 in this example) and can take the picture at that aperture.
Preset lenses give photographers a fast way to stop down a lens to a preset aperture, without having to count click stops, or take your eye away from the camera to see where you’re moving the aperture ring to.
Originally preset aperture lenses were superceded by lenses that offered set click stops (at f/2.8, f/4, f/5.6 etc) plus open aperture metering.
With these lenses, you set the aperture ring on the lens but the aperture blades remain wide open (again letting in maximum light for easier focusing) until the instant the picture is taken, at which point they close down to the set aperture via a lever or pin on the back of the lens being depressed by the camera.
But for those of us using film and digital cameras with vintage lenses via adapters, open aperture metering isn’t an option anyway, we have to stop down manually. This is where the preset aperture lens comes into its own.
What I like even more than the convenience of being able to close down in a split second to my preset aperture, is the fine adjustment it allows.
I shoot Aperture Priority (Av) 90% of the time or more. This is because I love to control the depth of field of the image.
Also, because I rarely shoot moving subjects, shutter speed is of little importance to me.
Photographing a decaying door or ancient gravestone or still flower looks exactly the same at 1/30s or 1/4000s.
Varying the aperture though – especially at the close distances I like to shoot at – has a dramatic effect on the final image and its depth of field.
With standard click stop aperture lenses, most have only full or half click stops. The actual number of the aperture I’m using is again pretty irrelevant to when I’m shooting Av mode.
But what if, in terms of the look of the photograph, the depth of field is too shallow at f/4 and too deep at f/5.6?
With a standard click stop aperture lens, you’d have to choose one or the other (or, with some lenses like for example a Yashica ML 50/1.4, you can find the halfway rest point between two click stops).
With a preset aperture lens, you simply turn the aperture ring until the image looks precisely how you want it to.
It’s irrelevant whether it’s f/4.37 or f/5.13. What matters is how it looks.
So, in practice, I often preset my aperture at a stop beyond what I think I will need. Then I have that scope for fine tuning.
For example if I think I’ll need around f/5.6, I’ll set the preset aperture to f/8, then open it up.
After composing and focusing, I’ll stop the lens down until the image I see is exactly as I want it. It might be shade past f/5.6, a little before, or bang on. I have that ability to find precisely what looks most right for me.
And, after all, isn’t that how all of us photograph anyway – point our camera at something then adjust our position and the lens aperture until what we see in the viewfinder is what looks most “right” to us?
Another advantage of preset aperture lenses, is not directly due to their preset feature but seems connected.
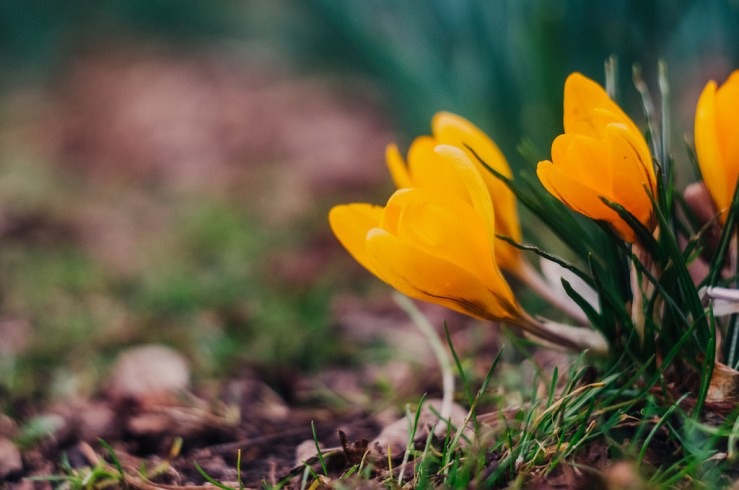
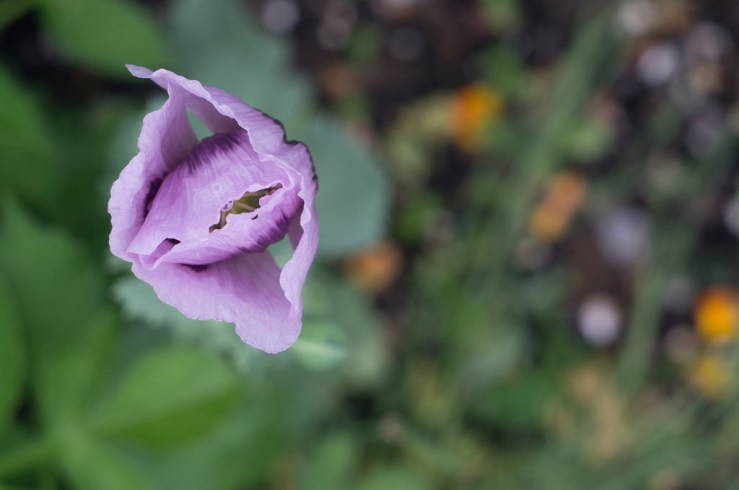
My favourite preset lenses tend to have more aperture blades, and ones that close down whilst staying very rounded. The result is smoother bokeh highlights, like this –
With a standard lens, the majority have six blades, and are very straight edged.
So the bokeh highlights look like this –
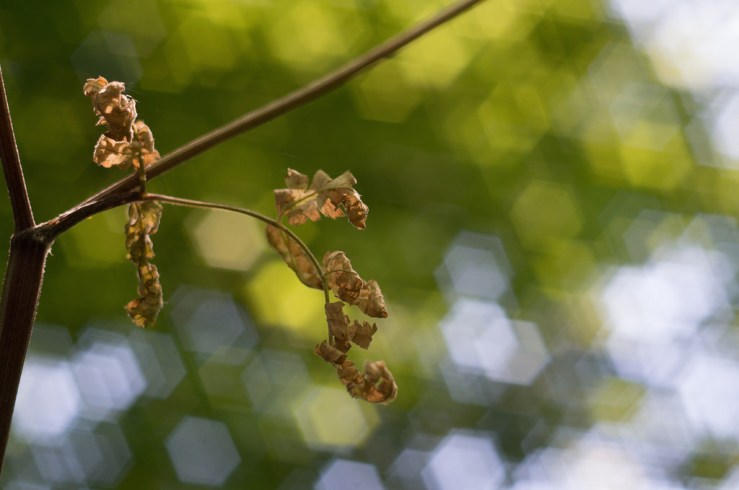
You can imagine how the first image would have looked it taken with the second lens.
Let’s directly compare two lenses.
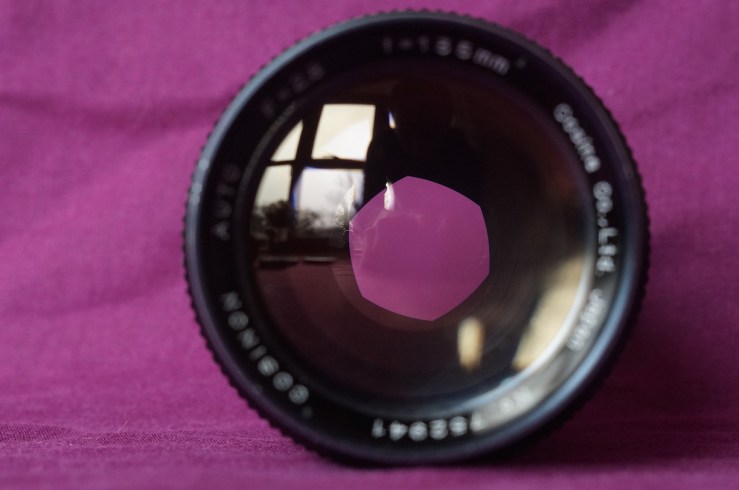
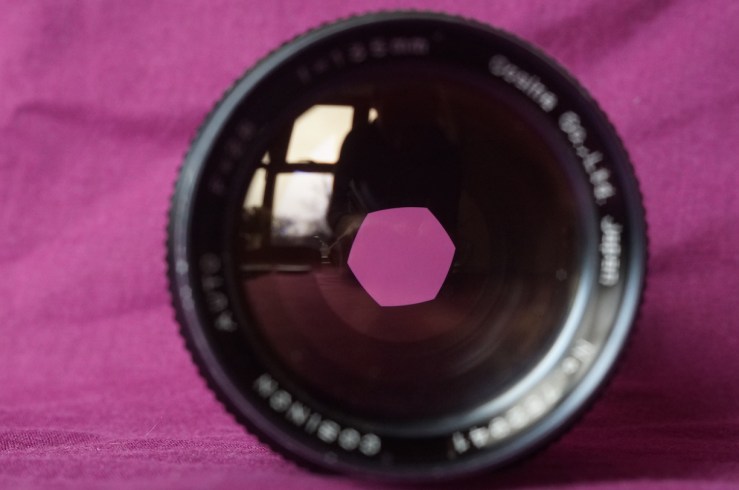
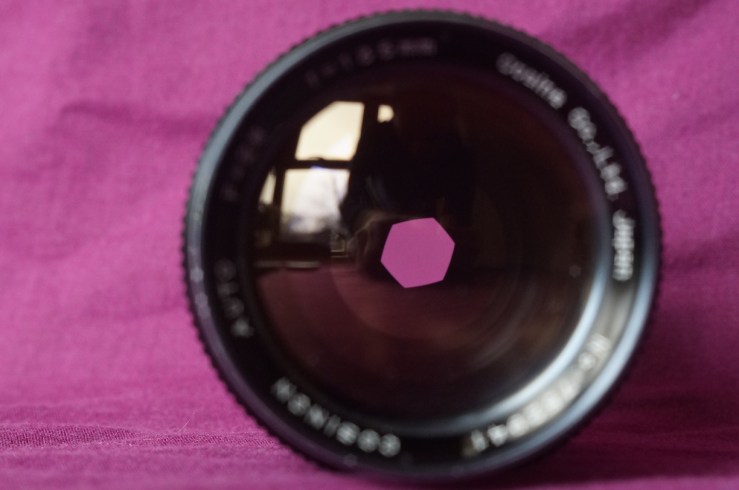
The first three images show my Cosina Cosinon Auto 135/2.8 at f/5.6, f/8 and f/11. Notice how the (hexagon) shape made by the (six) blades is already angular at f/5.6 and becomes even more so as you stop down further.
 The next three pictures show the Jupiter-37A 135/3.5 at the same apertures – f/5.6, f/8 and f/11. You’ll notice how because of the greater number of aperture blades (12!) and the way they close down, it’s almost perfectly circular, even at f/11.
 This smoother, more circular shape makes for smoother bokeh, especially in shots with multiple light sources where each one takes the shape of the open aperture blades in the lens.
Which preset aperture lens(es) I recommend
I love all three of the lenses featured in the first images above and would recommend any without hesitation. The Helios 44-2 58/2, Asahi Takumar 105/2.8 and Jupiter-37A 135/3.5. All are M42 mount and all are fantastic regardless of being preset aperture.
The fact that they are preset lenses just makes them, for me, even more enjoyable and controllable when shooting my preferred Aperture Priority mode.
If you don’t already use M42 lenses, then I recommend getting one of the three above plus an adapter for whatever you do use. It’s probably the most easily adaptable lens mount.
I’ve shot M42 lenses on Contax/Yashica, Pentax K, Canon EOS and Minolta AF film cameras, and Pentax K, Sony NEX (E mount) and Sony a100 and a350 (Sony/Minolta A/Alpha mount) digital cameras. Adapters exist for probably a dozen other camera mounts.
If you’re starting from scratch and want a super affordable film camera set up, check out my recent post on getting started with film for £27.
On the digital front I’d recommend either the Sony a100 DLSR or if you want something more compact and even more adaptable try a Sony NEX 3, 5, or 7. All are amazingly affordable these days.
With a film or digital camera plus an adapter for vintage M42 lenses, preset aperture lenses are a delight to use, infinitely adjustable and give splendid results.

Have you tried preset aperture lenses yet?
Let us know in the comments below.
Thanks for reading. Please share this post with others you feel will enjoy it too.


I didn’t even know this was a thing!
Ha ha, you obviously haven’t had any then Jim, time to invest! : )
The first one I got was the Helios 44-2 and it was very confusing as I didn’t realise there were two aperture rings. I was just turning the inner one and wondering why it didn’t full close down (the outer ring that presets the aperture was at f/8). I did a little research and figured it out. Now I love the presets!
[…] inner photographic jury is still out as to whether the Sonnar is optically superior to my preset Takumar 135/3.5, as I’ve only had the latter a couple of weeks. The Sonnar retains all the […]
[…] quick inspection revealed mechanically it was fine, with a preset aperture and lots of aperture blades, but with pretty serious condensation inside one of the rear […]
[…] love preset aperture lenses. They work great on film, and even better, in my view, with digital. Preset the outer aperture ring […]
[…] Preset Aperture Lenses – How They Work And Why You Need At Least One […]
[…] Preset Aperture Lenses – How They Work And Why You Need At Least One – Where I gushed my love of preset and often many bladed aperture lenses like the Helios 44-2 and Jupiter-37A. […]
I recently purchased a second digital camera, a Canon D750, so I could utilise my beautiful old M42 lenses that I had with my Ricoh TLS film camera. I purchased an adapter ring that links the old lenses to the new digital and it works well.
Some of my lenses are not M or A selectable but the others are and I set them to M.
I didn’t know what preset lenses were but now it seems I have two:
Hanimex Tele 1:6.3 f 400ml f 6.3 to 32
Hanimex 1 3.5 f 35ml f 3.5 to 22
My curiosity always wondered why these lenses had two f rings, one that ‘clicked’ and one that turned ‘free’. My other old lenses only have one f ring.
Hi Roger, thanks for your comments. I had a couple of Canon EOS film bodies (same mount as your DSLR) and did the same thing, use a cheap adapter to mount my M42 lenses. Great fun!
Preset aperture lenses are baffling to the uninitiated, I remember when I first got my Helios 44-2 (the first preset lens I bought) I thought it was some kind of oddball lens that had slipped through quality control as the aperture numbers seemed to go in the wrong direction. I didn’t realise that I was turning the second ring (with clicks) that dictates the minimum aperture, not the free moving ring that actually moves the aperture blades.
In the late 60s they were far more common than in the 70s and beyond when most brands evolved their lenses to have the M/A switch and aperture pin at the rear. Aside from some of the more common and well regarded ones I’ve highlighted in the post above no doubt there are dozens, if not hundreds of others in M42 mount.
Have fun, and let us know how you get on with your Hanimex pair…
Hi Dan,
Thanks for your comments. I started out with my old Ricoh TLS film camera with screw mount many years ago, when in a camera club at Amberley RAAF Base. I eventually graduated to digital, with my first being a
baby Fujifilm, which was handed in time to my wife then down to my grandson. I then purchased a Lumix 20-1200 single fixed lens maxi zoom in 2014 for a Europe holiday to save lugging around a bunch of different lenses.
I one day took out my old Ricoh and found my four old lenses, then researched a digital to go with them through an adapter plate. I settled on a Canon 750D EOS and now I can have fun with old lenses , albeit I have to use a manual setting on the camera and the M setting on the lenses. I don’t know if the A setting { auto } on the lenses will work but I suppose I can only try. The good thing is if a photo doesn’t turn out you don’t have the Sleeping Beauty syndrome – “Someday my prints will come”. You can delete a bad photo when you take it.
The Lumix, in turn, has been handed to my wife seeing as the Fuji was handed to the grandson, who is ten and developing { pun intended } an interest in photography. I will tell him never to be negative about his photos but to see how things turn out when you try different f stops on manual. I’ll also suggest he buys a manual hand held light meter, as they are handy for accurate light on your subject … you can walk up to the subject, take a light reading then go back to your photo point and take your shot. I still use mine.
I have also resurrected my old ‘ham and eggs’ TS 855 flash gun, a ‘double barrel’ { master / slave } Thyristor and I now fit it to the Canon via a Pixel adapter cube. The cube goes on the hot shoe and the flash on top of the cube. You then connect the flash into the cube as the camera doesn’t have a port for the cable. It should make for interesting shots – the flash, when set on 100 ASA uses f8 up to 12 feet and f4 beyond that. It has a three position switch, two for auto setting [ red and green } and a white setting for manual.
I purchased my four M42 lenses second hand in the early 70’s, including the two presets, so I imagine they’re pretty old – could even be late 1950’s. I also purchased, in a second hand shop, a 3x televerter and a set of three extension tubes. I even found a strange little external view finder device, made by Ricoh, that attaches to the hot shoe for viewing the scene from ‘outside’ the camera. Gawd knows how old that is… maybe Noah used it on the Ark to take photos of the animals. This photo of a lion was taken with the Lumix from about thirty feet away in a South Africa game reserve.
NGALA 17.JPG
Anyway, I’ll keep in touch.
Regards, Roger
Roger, have I read that right, the Lumix has a 20-1200mm lens?? Or is it 20-200mm? Yes I do like the convenience of digital, and the reduced fear of wasting a shot that you have when you’re paying for the film!
I never use flash, I’m a natural daylight photographer almost exclusively, so your details are lost on me I’m afraid! Sounds like you know what you’re doing.
Your link to your picture hasn’t showed up, do you have it hosted online somewhere like Flickr so you can post a link?
Hi again Dan,
Indeed it is a 20 to 1200. The camera is a Pansonic Lumix FZ70 and has a non interchangeable lens, rated at 60X Optical Zoom. I have also fitted a Vivitar .43X wide angle convertor that attaches to the end of the lens.
Regards, Roger
That’s amazing, so with the wide angle convertor you have about 9mm at its widest, to the 1200mm without convertor at the tele end!
What are the images like at the long end? I think the longest lens I’ve ever used is a 200mm on an APS-C, so it was 300mm equivalent filed of view. Can’t imagine 1200mm!! Or indeed 9mm!
The converter introduces some vignette at one end and you get a ‘tunnel’ view. That can be fixed by just backing off a tad on the zoom.
Out of interest, look in the attachment bar on my earlier e-mail and see if the photo of the lion is there. It should have come through.
Roger, I don’t have an email, the comment on 35hunter just appears with the image as a line of text – NGALA 17.JPG. I’m not sure what you mean by sending an email?
How then should I send the photo?
If you have the photo online I think you can just post a link. I have mine on Flickr and when I post the link to the page on Flickr it displays the photo here in the comments box.
You can’t upload or attach a photo to someone else’s WordPress blog, as far as I know.
It may not be possible. I don’t have Yahoo or Flickr
[…] I talked about preset aperture lenses a while back in far more detail, but in short the main reasons I love them are the infinite control they give you over depth of field, and how you can start with the lens wide open and maximum light entering to make focusing easier, then quickly stop down to the require aperture and shoot, without clunking through click stops. […]
[…] Preset Aperture Lenses – How They Work And Why You Need At Least One (Mar 2017) – If you’ve never tried a preset aperture lens, I suggest you do, perhaps starting with the excellent and charming Helios 44-2. […]
[…] it’s a manual focusing lens (in fact it’s a preset aperture lens, which I love), I shoot Aperture Priority (Av) and where I need more critical focus, make use of the GF1’s […]
[…] aperture blades plus clickless aperture reminds me of the some of the preset aperture lenses I’ve used and loved in the […]
Just bought my first vintage lens – the Helios 44-2 58. Like others I struggled with the concept of the pre-set aperture initially but now I understand it (thanks to this article) I’m loving it. So much fun for so little money! I’m hankering after a Takumar 105 now…
Rose, always great to hear of someone discovering the fabulous Helios 44-2 lenses!
I though mine was a factory mistake when I got it as the numbers seemed to go backwards relative to the aperture, but no, that’s how the preset aperture set up works.
The Tak 105/2.8 is a beautiful little lens. I found it useful on an APS-C sensor digital camera too, as it became around 158mm field of view, whereas 135mm lenses on the same cameras were 203mm, just too narrow.
That said, the Jupiter 37A 135/3.5 is another fantastic preset lens worth trying.