Exposure compensation is a way to manually adjust the exposure of a photograph by a set amount.
Typically it’s a dial or control that allows increments of third or half stops, either over or under the default exposure the camera will otherwise take the photograph at.
Personally, I’ve used exposure compensation more than not often when out shooting, for some years.
Here are the different approaches I’ve used with different types of cameras, and why.
35mm Film Cameras
Whilst a number of film cameras I’ve used have a dedicated exposure compensation dial, more usually I’ve used the ISO dial or setting for the same purpose instead.
Indeed with many cameras it’s exactly the same dial doing the same thing, just with one scale for ISO and another for exposure compensation.
I guess the exposure compensation is easier to understand for some than converting ISO speeds which a less regular scale.
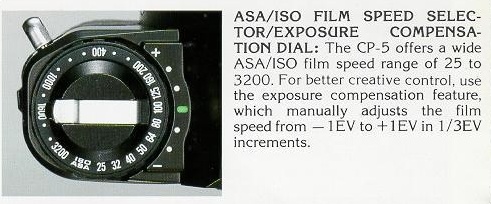
In the image above for a Chinon SLR I had similar versions of, increasing exposure by one stop on the exposure comp dial is the same as dropping one stop on the ISO, eg ISO100 to ISO50.
Plus although the manual claims only -1 to +1 of exposure compensation is available, of course when looking at the ISO scale, every further click up or down the scale gives you another -/+ 0.3 of exposure comp, until you’re at the extremes of the dial, in this case ISO25 to ISO3200.
Anyway, I predominantly shot ISO100 or ISO200 colour negative film, and quite often it was expired.
What I found is that with fresh film, shooting at ISO80 or ISO64 with an ISO100 film (or ISO160 or ISO125 with an ISO200 film) gave me slightly more saturated colours.
Plus, with the exposure latitude of film being very forgiving, and typically -1/+3 with consumer colour negative film, it made sense to lean more towards over exposure than under exposure, as the film is more tolerant in that direction.
With expired film, I’d usually start with one stop over exposed, so ISO100 for an ISO200 film, or +1 if we’re talking exposure compensation scale.
Digital Compacts
Digital photography I’ve found far more particular when it comes to exposure.
The biggest exposure challenge in my experience is to not overblow the highlights, ie make the brightest parts of the photograph too bright, so all detail is lost and it’s just an ugly white blob.
In my early experiences of digital I was oblivious to this, and wondered why some images had these bright dripping plasma-like areas that spoiled an otherwise pleasing photograph.
To avoid this now, when using one of my handful of digital compacts, I always start with -0.3 of exposure compensation, ie one third under exposing.
This takes care of most over blowing issues, as long as I’m also careful in scenes where there is great contrast and/or a particularly bright light source in one part.
Then I will either use exposure lock to find an exposure that better suits the scene overall, or drop the exposure compensation to -0.7 or -1 and experiment.
Of course with digital you have the luxury of checking the exposure on screen and retaking the shot if need be, although with digital compacts this doesn’t happen particularly often.
DSLRs
Returning to shooting DSLRs in the last couple of months, I’ve found the golden rule for exposure compensation is that there is no golden rule!
Depending on the camera, lens and conditions, the exposure compensation required to achieve what appears to be a satisfactory exposure to the eye varies significantly, perhaps up to one stop either side of what the camera’s meter chooses.
More challenging than the amount of exposure adjustment required is how much difference even just a third stop makes, especially again when we return to overblown highlights.
Sticking with one camera for much of the last month – my Pentax K100D – and four lenses, I have found some patterns at least. And it feels a far more predictable camera exposure wise than the later and supposedly far more sophisticated K30 I also have.
With the K100D and my two A or F series lenses, +0.3 exposure compensation is a good starting point, in good lighting. If it’s very bright, zero might be fine, and in more overcast situations +0.7 or +1 might be best.
This can also change depending on aperture too, but much of the time I stick to a limited range of around f/3.5 to f/5.6 to minimise this, and because I don’t generally favour very shallow or very deep depth of field.

With my later two DA lenses, I start with -0.3, the same as with a digital compact.
As with the A and F lenses, if it’s brighter I’ll drop down, either to -0.7 or -1, and if it’s dull, perhaps zero or +0.3.
Two exposure aids I use with my DSLR when reviewing the image are “blinkies” and the histogram.
The blinkies are exposure warnings, and on the review of the image on screen after you’ve made it, show any areas that are over exposed blinking red, and areas underexposed blinking yellow.
I rarely care about the yellow, but if there are red blinkies I’ll usually then zoom in closer to see whether they are acceptable, or if I need to shoot again with a lower exposure compensation (or using the exposure lock button to meter for a different part of the scene).
The histogram I find most helpful when it’s a bright day and the screen is hard to see and make a good judgement on the exposure of a shot.
With a DSLR, and even when you’re using one body and only very few lenses, there’s rarely a shot where exposure compensation isn’t required and the resultant image at the default exposure settings is satisfactory.
I thought for a while this was just me, but the more I read about it, the more it seems the norm, and an expected element of exposing with a DSLR, so I’m learning to embrace it too.
So that’s how I use exposure compensation with three main different types of cameras.
As you can see, without it I wouldn’t have the optimally exposed images from any of them, and whilst film is probably forgiving enough and can hide a stop of exposure inaccuracy, digital sensors certainly aren’t.
How about you? How often do you use exposure compensation with your photography, and what approach do you take?
Please share your experiences with us in the comments below (and don’t forget to tick the “Notify me of new comments via email” box to follow the conversation).
Thanks for looking.
What Next?
Share this post with someone you think will enjoy it using the buttons below.
Read a random post from the archives.
See what I’m up to About Now.


I too have found that the digitals prefer -1/3 stop in ordinary bright light conditions. It also matters how reflective the scene is, as meter considers the whole to be 18% reflective which is almost never is. Digital is like direct-positive film; no interim step in processing so it prefers under exposure and has low tolerance of over.
Incidentally, I was just trying to explain taking moon pictures to someone and realized there is a psychological barrier of “it’s night, so I need more exposure”. Auto metering ‘thinks’ the same way, which is why it doesn’t work in either largely bright or dark conditions.
Marc, I didn’t know that about how reflective the scene is. I do find that photographing white or yellow flowers is very difficult, exposure wise. If you expose over the average of the scene (multi/matrix metering) the brightest part of the petals are always blown out. If you meter for the brightest part (I generally centre the camera on this, then lock exposure, then recompose), then often the other parts of the flower are too dull. So there’s usually a compromise, and a hint of overexposure on the bright parts. White and yellow flowers reflect light very brightly on a sunny day, even to the naked eye. I should just stick to other colours!
That’s interesting about shooting at night. I remember I experimented with some long exposures (on film) a few years back, on a motorway bridge, looking west towards the sunset. My main intention was to photograph the light trails as the cars passed by. But I was quite amazed at how bright the sky was in the photographs, and how much colour (from the sunset) there still was, despite it appearing virtually pitch black to my eyes. It’s incredible how cameras can suck light in, when our eyes can’t.
Dan, in a moment the reverse is true: our eyes see better in the dark than a camera does. But over time the camera accumulates light, which is something eyes can’t do. In that respect our vision is more like video than still, with a ‘fixed shutter speed’ – and persistence of vision which causes us to see motion in rapidly changing still images.
I hadn’t really thought about that before. Yeh in a dark room, our eyes will adjust over a period of seconds to see better. But there is a maximum amount of light that can enter. If our eyes constantly accumulated light like a camera we’d have to be constantly blinking frantically to avoid overloading them!
With cameras too though, there must be a limit? If you went somewhere remote and rural with no (or very little) light at night, and left a camera’s shutter open for hours, it wouldn’t eventually create a photograph that looked like daylight. Would it?
No it wouldn’t, because the nature of light is different between day and night. We’re pretty shy on incident light around here at night, and a long exposure doesn’t end up looking like daylight. This is one of the things I will experiment with this Winter, once we have the snow for reflection and some moonlight in the dark.
It’ll be intriguing to see how your experiments go. I think I might try a few long exposure night shots of my own, just to see how the light behaves and how much a camera will suck in over longer periods of time…
A Scottish photographer I worked for in my younger days told me to take a light reading of the back of my hand in the same light I was shooting. I am a caucasian of medium skin color so this worked perfectly for me. I just set the camera for that exposure and then shot away.
My present film camera has exposure lock so I take my light reading of an area I believe will give a truer light reading balance and then lock the exposure setting. I also use the exposure compensation when I am unable to get a reading that I believe best suits the scene.
As far as long exposure night photography and the moon if memory serves me correct I believe the moon needs to be exposed at 125th@f8 ISO64 to avoid over exposure. The reason I know it for ISO64 is from the days of Kodachrome. Most of my moon shots with the Dallas skyline were double exposures because the time at which the light would balance between the buildings and the moon placement never matched up. I do have a few straight shots but the moon is always slightly blown out. Some of the more interesting night cityscapes can be when there is heavy cloud cover. All the reflected light lends itself to some interesting and incredibly well lit night shots. It’s fun to “see” what the film saw over 1-2 minutes depending on ISO/aperture setting. As far as film and reciprocity I never had a specific color that I was shooting for so any color shift was just icing on the cake. The sucking in of light as you called it made for some incredible after sunset cityscapes with the glass on the buildings(sunset behind you and shooting to east/south east depending on the time of year).
These all sound like fascinating experiments Bill, I really need to experiment more with long exposures at night! I’ll have far more opportunity with the nights drawing in, currently it’s not dark until perhaps 830.
The other interesting experiment I forgot to mention is light painting with off camera flash or some other portable light source. You can make this as simple or complex as you desire. I’ve done several small still lifes using a flashlight to “paint” in the parts of the image that I wanted to highlight. These were done in almost total darkness and I shot about 5 different versions. If you are using color film then the light source color temp is an element to think about. I have done this with a digital camera also and it was easier to tweak the effect since I could preview what each attempt looked like. Don’t think of darkness as a limitation but see it as a chance to expand your ability to overcome obstacles that will attempt to block your ability to get a shot.
Bill, so you use a long exposure then wave (paint) a light source around so it comes out as lines rather than a point source on the final image? If this is what you mean, yes I have done this but not for ages. We’ve done it on bonfire night with out kids too, drawing shapes like hearts and stars with their sparklers…
[…] Film cameras compensate for their exposure in the same way that digital cameras do. The distinction between a black cat in a coal mine and a white cat in an avalanche cannot be explained by most cameras. Some cameras are now better at distinguishing between difficult and easy lighting thanks to newer color-based light meters and library-based exposure algorithms. It is common to hear shutter sounds when using an SLR, with the reflex mirror acting as the primary driver. While shutter time is important, the mirror movement takes the same amount of time before and after exposure. The three factors that can be used to determine exposure are exposure via television, exposure via Av, and exposure via ISO/TSI. The intensity of the signal amplification is altered, albeit in a slightly different way, by exposure compensation, whereas it is unaffected by sensitivity changes. ISO 100, regardless of EC setting, has the same signal amplification regardless of whether it is set to -5, 0, or 5 at the time the image is taken. Before the sensor is converted to raw digital data, ISO must be set to limit the amount of amplification of the analog information leaving the sensor. […]
A friend’s mother gifted me a box of expired 35mm film. I am just learning about pushing and pulling, and I’m befuddled as to what camera ISO or exposure compensation settings to use and what instructions to give the development lab.
The wisdom on the web is that colour film can be overexposed by one stop every ten years since the film expires and must be pulled when developing. For example, for expired Kodak Provia 400F I’ve had success exposing it at box speed. But maybe that was a fluke. If exposing another expired roll and I want better results:
* Do I set the ISO dial at ISO 200 and tell the lab to pull 1 stop?
* Do I set the ISO dial to 400 and the exposure compensation dial to +1 and tell the lab to pull 1 stop?
* Do I expose at ISO 400, EV0
[…] I set the ISO dial to 400 and the exposure compensation dial to +1 and tell the lab to pull one […]