A year ago I used LightRoom to process RAW photographs captured with my Pentax K10D DSLR. This evolved.
Six months ago my preferred workflow was using my iPad or iPhone and Hipstamatic to process JPEG photographs made with my digital compacts.
Now, the act has evolved further still, and I use my Sony Xperia Android phone with Snapseed to process the JPEGs from the digital compacts.
Currently one camera makes photographs with no need for post processing. The wonderful Pentax Q with its internal options for bold monochrome shots, has enough creative control that I’ve been able to set it up to create the final image in camera.
In some ways this was the zero processing holy grail for me.
But my Xperia/Snapseed set up is now so fluid it takes merely 13 seconds on average (yes, I’m geeky enough to have timed myself for multiple photographs and taken an average) to get the black and white (b/w) look I like. So I don’t mind going through this process for the images from the other few compacts, for the improvement I think it makes.
Here’s what I do. Firstly, in camera.
Depending on the camera, I set it up to make b/w photographs. The Ricoh GX100 has this option, but no further options like contrast etc.
My Ricoh GRD III does have contrast options so I add a little contrast to the standard set b/w set up. The Sony L1 and Olympus C4040 which I’ve bought recently, both have a b/w mode, and contrast settings, so I bump up the contrast in those too.
Typically for all of these cameras, I use exposure compensation to take the edge off.
With the Ricohs, -0.3, with the Olympus it’s -0.7. The Sony exposes very well at 0.
With digital compacts and their smaller (than DSLRs and mirrorless) sensors, you notice certain characteristics.
One is a far deeper depth of field, another is they tend to blow out highlights more easily.
Whereas with film I used to over expose virtually all of the time as all of the film I used had a latitude of -1/+3, ie you can expose it between one stop under or three stops over and still get great results.
With digital it’s the opposite, I tend to expose for the brightest parts of the scene.
This works on two levels – first I don’t get many problems with blown out highlights, and second when you have higher contrast scenes, by exposing for the bright parts it makes the dark parts really dark.
I dislike b/w photos that are merely shades of grey, and like my blacks to be deep, dark, inky pools you can dive into. You’ll rarely hear me talking about recovering detail from shadows!
Once the images are made in camera, I upload them to my MacBook, either plugging the camera in directly or via a USB card reader.
Either way, Image Capture shows the thumbnails and I Import all photos from the latest photowalk with one click.
These days my filing is far simpler than when I had dozens of film cameras and started a new folder for every roll of film, labelled with the camera, lens and film. Now I just have a folder for each month and all photos made across all cameras go in together. After that point I’m not really interested which camera made which images.
My MacBook is synced with Google Photos (GP), so as soon as they start importing from the memory card, the start uploading to GP too.
Once done, I double check the files are on my MacBook, and in GP, and delete all images on the memory card so it’s ready for next time.
Although I have a few 16GB SD cards, I also use 1GB and 2GB cards that never fill up on one photowalk. It’s all I need.
After ejecting the memory card/ camera, it’s off to Google Photos.
Usually I’ll sweep through first on my MacBook or ChromeBook (both have 15″ screens) and delete those that don’t make the grade.
Those I do like, I then edit using my phone. It’s just easier, quicker and more portable. I have Snapseed on my iPad, but just don’t bother as it’s involving another device unnecessarily.
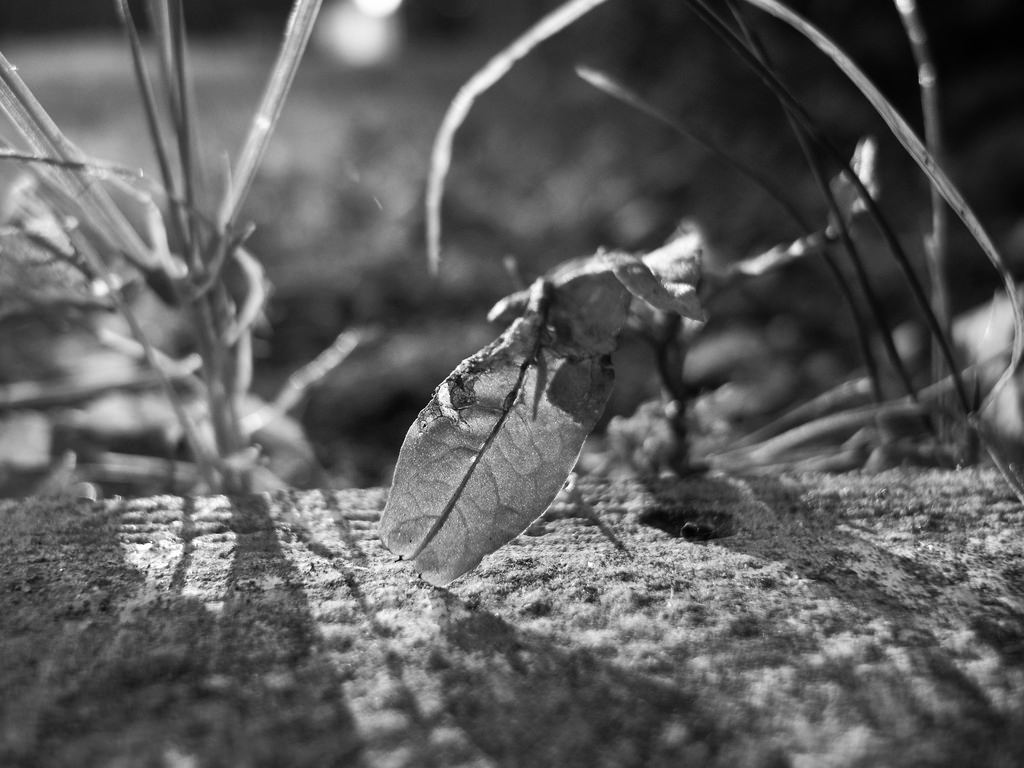
For this demo, I’ve used the Ricoh GX100 to take a few snaps in the front garden.
This is how one looks straight from the camera.
 For me, far too many of those shades of grey I mentioned, and nothing is really black at all, even in the top corners of the composition.
Now on my Xperia phone, from GP, I go to menu (the three dots) > Edit In > Snapseed.
The “Styles” appear at the side of the image, both those that come with Snapseed and my own I’ve set up.

I tap on the “GX100 etc” high contrast b/w Style and it applies it instantly. If I want to see how it compares to the original, I just hold my finger on/off the image and it toggles between the before and after.
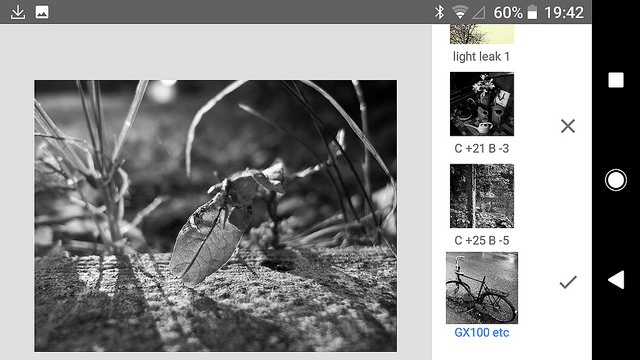
Then I tap the tick, then Done to save the processed image.
The phone exits Snapseed and reverts to the original image in GP, which I usually then delete, once it’s confirmed the Snapseed version is saved.

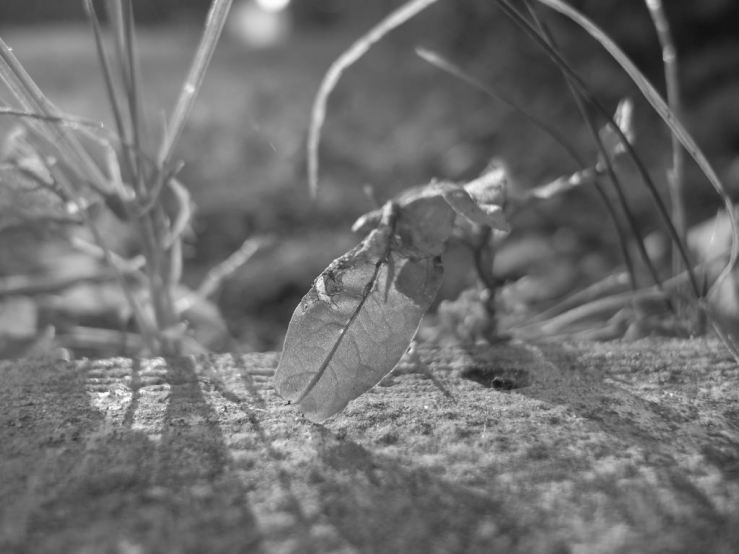
As you can see, these tweaks, though quick and logical, for me make a significant difference to the final image.
I usually do this processing for most or all of a photowalk in a batch, then at a later date go through again on GP and delete any that aren’t good enough.
Those I do like, I download to my MacBook and upload in Flickr, so I have a version on the MacBook, GP, Flickr, and after a few weeks, another back up on an external HD when I do my routine TimeMachine back up of everything on my MacBook. Probably too much, but I haven’t quite worked out how to streamline at this point.
So this is how I use a preset Style I’ve already saved in Snapseed, but how did I set these up in the first place?
Again, you know me, it was simple!
I really do like Hipstamatic, it’s a fun and tactile interface on iPhone and even better on iPad. But the glaring omission for me is I never really knew what I was doing to get the photos how I wanted them.
Hipstamatic is based around applying one or more of three main variables – film, lens and flash. I came to learn that using a certain film with a certain lens and a certain flash gave me a result I liked. But I didn’t know why, or what those film/lens/flash presets were actually doing with the original image.
I wasn’t learning anything, it was purely trial and error.
When I switched to Snapseed (because Hipstamatic is iOS only), I instantly appreciated that the settings are in a far more direct language.
Yes there are lo-fi options in the Vintage and Retrolux groups that are reminiscent of Hipstmatic. But even then, the parameters you can adjust are named logically, like Brightness, Saturation, Style Strength and Vignette Strength.
You can make an educated guess at what reducing or increasing these sliders is likely to do, so you know which to choose and which way to slide them. With Hipstamatic there wasn’t this opportunity for learning and understanding more.
For my b/w images I started with, yep, the b/w group of settings.
Essentially it converts to b/w by desaturating all the colour (though I’ve usually done this in camera already), then you can adjust three parameters – Brightness, Contrast and Grain. You can either start with one of the sub-presets – eg Contrast or Film, or just the Neutral one. Each of these has a starting point setting already applied on the Brightness, Contrast and Grain parameters.
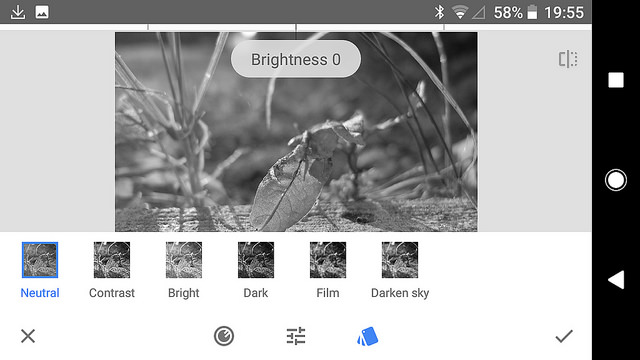
I started with Contrast, as that’s what I mostly wanted to do, add contrast.
Then going into the three parameters, by default Brightness is 0, Contrast is +30, Grain is 0. I reduced the Contrast a little (you just slide your finger across the screen, left to reduce, right to increase), and took the Brightness down a touch too.
In the end, I’ve found because of the slight variation in how b/w photographs come out of different cameras, it’s been useful to have three b/w presets, offering differing graduation of a higher contrast, darker, blacker look.
They’re all around Contrast +25 and Brightness -5 give or take a few notches.
I don’t like to add “fake” film grain, so leave this at zero.
I prefer using the ISO of the camera to create a little noise/grain, which is why I usually shoot at ISO400 or 800 rather than native ISO. Except with the Olympus C4040, where there’s a little grain even at ISO100, so I use that. As we’ve talked about in the past, the older CCD sensors seem to give a much more organic and pleasing noise/grain. But that’s a different conversation!
Having these three b/w Styles, all higher contrast, but to varying degrees, means I rarely have to go back to scratch with processing photos. I just choose the one of the three Styles that looks best to my eyes.
So that’s it really.
If you haven’t used Snapseed yourself I would encourage you to try it.
For me it’s infinitely more logical, approachable and direct than LightRoom, in which I probably used about 2% of its overall features.
And the results for b/w are better than I used to get with LR after ages of fiddling about and not really knowing what was working.
And whilst I like Hipstamatic, if you want to understand what you’re adjusting and the impact it has on the final images, Snapseed is just so much more direct and obvious and logical.
I hope this has given you an insight into my simple workflow, and encouraged you to try something new.
What do you use to process your photographs? Is it working as well as you’d like, or are you open to other options?
Please let us know in the comments below (and remember to tick the “Notify me of new comments via email” box to follow the conversation).
Thanks for looking. Please share this post with others you feel will enjoy it too. If you’re interested, this is what my photography life looks like right now.


Snapseed is fantastic.
Not a “pad” or tablet user, but I’m starting to look at putting it on my desktop (with a 24 inch monitor for improved viewing). Still just a little cautious about the extra software required; the desktop use of Snapseed requires an intervening bit that emulates an Android environment in which to run it.
The thought of a direct smartphone-to-big screen desktop Snapseed editor is very appealing – anyone here done this as yet?
William, I checked some Android simulators myself (like BlueStacks, which seems to be quite good). Problem is that these simulators work fine for “keyboard” apps, such as WhatsApp, but not so much for apps based on a touchscreen workflow. And that is of course the case with Snapseed.
Ah, thanks for the tip!. Shucks – I’m a diehard keyboard Luddite myself, so …
William, having a browse online you can use a device like the Chromecast “dongle” to plug into a TV or monitor and it essentially becomes an external monitor for an Android phone. I know I’ve done a “screencast” thing with certain apps, like YouTube, directly from my phone to a smart TV which is really clever – you still control the app on your phone screen but it also plays on the big TV.
As Robert has mentioned, Snapseed is a touchscreen app, I can’t see how it could be controlled on a screen that isn’t touchscreen. Well, it couldn’t! But by linking to a big screen for viewing, and still controlling it on an Android phone/tablet, it would give you a much greater viewing area. Do you have an Android phone already?
Hah! Thanks! You know, I’ve used my Samsung Note 4 to cast to the Samsung TV via the Roku Ultra box before, and it never occurred to me to just throw Snapseed up onto the TV screen as well…zero points for sentience, awareness, and logic here…will be trying that out tonight.
You know, heeding Robert’s remarks, I went through the tedious drill of downloading and installing Bluestacks yesterday, just for giggles and despite the no touch screen thing, just to see what was what. Through it, I downloaded Snapseed to the PC, and – Surprise, Surprise!: the mouse button controls tool screen “sliders” as handily as on the smartphone.
But…I didn’t care for the flashy, noisy, gamey Bluestacks environment at all – it’s a huge RAM hog, and the laborious unpacking of the whole package at start-up is tiresome. “Saving” edited images locally was a pain and shot-through with bugs (I do not use Google cloud functions or storage or backup of any kind, do not entirely trust them ever since finding their fingers in my pocket, tracking my local bricks-and-mortar shopping habits against my “location” history and hosing me down with ads),
Idly sitting here just now, I used the Airdrop app to mirror the phone to the pc. Works, uh, OK-ish; the old eyes gotta go full screen to see the detail I want in editing with Snapseed, of course; but it bears some more trial.
With this mirroring trick, of course, in order to work with shots *not* taken with the phone, I have more steps in getting those images into phone storage first, via hardwire or Bluetooth or WIFI, a tad onerous but reasonable when the images are not gigantic and the numbers of shots to be edited are not great. The Bluestacks route allowed me direct use of the other, non-phone shots in PC or gallery storage.
One can see that a Snapseed version for the PC not requiring an Android emulator might soon kill-off more expensive edit software for the large community of folks who don’t need lots of layers and the more complex bit-wrenching; lots of PS Elements users, et al…
William, could you longer term look at an Android tablet (or iPad) and use Snapseed directly? I have a 15″ MacBook Pro, and a 9.7″ iPad. To be honest, the distance I sit from the MacBook, compared with having the iPad on my lap (ie significantly closer) the screen size is not that much different. Plus the resolution of the iPad screen is very good and even though my eyes aren’t as good as they were, compared with using Snapseed on my phone, the iPad is hugely bigger. You might not need to use a bigger screen at all.
arrrggh! Forgot to say, Dan: that’s a very nice shot, and the edits are perfect.
Thanks William, it was a throwaway shot on our front drive just to show how much difference a few tweaks in Snapseed can make – and how logical it is (to me at least!) compared with the more Lomo inspired Hipstamatic app and how simple and lean it is compared with the behemoth that as LightRoom.
Hi Dan, this is very valuable information that I will certainly re-read when I get home from work.
Thanks for the tips!
Glad it helps Jon, please let us know how you get on with your own Snapseed experiments.
‘How I Use Lightroom To Simply Process Black And White Photos In 0 Seconds’ Open lightroom, import photos and THAT’S IT.
Whether you are using a proper monochrome camera or a de-saturated colour photo. Just open one photo, set it up as you like ONCE. Then find the Reset button in the lower right corner of the screen. Hold down whatever the equivalent key on a Mac is for ALT. Once Reset magically changes to ‘Set Default’ while holding down ALT or (whatever Mac) click it with your mouse. (or Trackball like you should be using.) or Wacom pen. The next time you import your photos to Lightroom they will all look the same as the one you tuned up that one time. There, zero second to inky black. Actually you do have to do this for each camera.
I have never paid for Lightroom, it used to come with the cameras I bought. I have the final version before all that stupid CC garbage, 6.21. I think this would really save you time, at least I hope you try it.
Thanks Corvus, I’m sure that’s a useful tip other LightRoom users aren’t aware of. I remember in my final days of using it I found this option, to import photos and apply a preset automatically, but I think I did it a different way, via a menu.
Anyway, I grew so disenchanted with LightRoom I won’t go back now, and for my humble needs it’s just far too sophisticated, like using a JCB to crack a walnut.
Snapseed fits in well with my simple workflow and my general desire to keep things as streamlined and direct and economical as possible.
Plus, as I said above, I actually have three b/w presets set up, which have slightly varying degrees of contrast. I generally try the darkest one and if it’s too inky, I go to the next darkest. If I applied one preset automatically in LR I’d still have to sift through the photos and potentially undo one preset and apply another, or reduce contrast another way for some of the photos. There’s not one preset that’s ideal for every single photo.
Another major reason I ditched LightRoom was the whole subscription thing. I did originally have a bought version, then at some point got signed up to a subscription with an upgrade which I thought was just for a year, then you keep whatever version you’ve upgraded to. But to keep it going, you have to keep paying the subscription (around £10) a month. Just thought this was underhand and a rip off, paying say £360 for three years for software you used to be able to buy outright for £100, or like you, it came with a camera free anyway. Just don’t like Adobe’s whole approach with this. So I waved goodbye and haven’t looked back (despite them sending me emails at least once a week to return, ha ha!)
I agree that Adobe is a total scum company that I should pay Russian hackers to wipe it out. However I does do the zero processing the best for me. The old stand alone product does the job, slowly but it does it. Often this very fast gaming rig will take 4 hours to process one 128 gig card with 900 photos on it.
I believe more people will switch to other options. Adobe slit it’s own throat by temporarily stealing huge profits.
Yeh if I had that many files to process I wouldn’t do them one by one in Snapseed.
For me this is another appeal of using older digital cameras with lower MP and therefore smaller files. Quicker to process (ie upload etc) and less to store.
I can’t see how anyone would think Adobe’s approach with LightRoom is an intelligent one. Even worse is when I tried to leave they offered me three months free (which I took to save the subscription fee I had to pay to the end of the year anyway.) I hope people ditch them in their droves.
Dan, you’ve said “I can’t see how anyone would think Adobe’s approach with LightRoom is an intelligent one.”
But it is, you know; from where they sit.
The switchover from one-time purchase (the CS – “Creative Suite”) to a subscription model (“Creative Cloud”) was made to maximize profits *over the total projected life-cycle of the product.*.
It centered on the fact that Adobe may almost be said to have invented the business and therefore “owned” a huge invested personal and corporate user base of years’ standing whose legacy use after mastery of a steep learning curve over generational evolution kept them invested. For the deeply-committed – especially on the corporate side – price-resistance would certainly lose to historical investment and use. And that, even despite the fact that alternative products that are cheaper, easier to use, and “better” would, as they well knew, inevitably appear.
We may be quite sure that this was not done without the most intense actuarial study of users-in-place, trends, likelihoods and probabilities ever done this side of a Moon launch. The Adobe suite does indeed have a projected life-span, and the intent is to squeeze every possible nickel from it before it is deposed.
And this is the current state of all business thinking
Thanks William, yes, “intelligent” wasn’t the best word to use. I meant I can’t see how any end user would welcome this move from a one time fee to an ongoing subscription, at the fees they charge.
I don’t know the breakdown of Adobe LR users (they of course do, and with a subscription model can monitor this ever more closely) but I would imagine that the majority are amateur photographers who use perhaps 5% of the application’s functionality at most, and are (or rather were) quite happy with a stand alone application that lasted five years or more.
If they offered more reasonable fees it would be better, but my basic monthly sub of £10 something over a year was the same as I originally paid for LR 4 or 5 maybe seven or eight years ago.
If we upgrade a stand alone app every five years say and it costs £100 up front, we pay £20 a year.
With their subscription model I was paying £120+ a year, year after year, so in that same five years, if I’d have stuck it out, I would have given them a ridiculous £600+!!
I appreciate too that the subscription model is very powerful, and if done well can work for both the provider and the customer.
If we feel as a customer we are getting a good product/service, for a reasonable fee, we’re more than happy to pay for it. I would cite my Google stuff as an example, it’s £1.59 per month for 100GB storage. An decent 128GB memory stick might cost me only £25 say, but that’s 15 months of the convenience of having the various Google syncing I use, and my stuff instantly available on multiple devices.
At present, I see that fee as fair and reasonable and the approach does not seem anything like Adobe’s.
Maybe I’m being naïve, but ultimately I’m happy with subscriptions if they give me what I want at a fair price, and I imagine most people are too.
I don’t expect the majority of LR users would say that paying the same fee per year as the stand alone app costs as a one off is fair in any way.
Like many things we’ve discussed recently, when we do find an emerald amongst the oceans of gravel, it becomes ever more precious. In this case, finding a company that offers a genuinely useful, reliable and good value service.
Absolutely, your Google sub is a good deal, and quite fair.
But it’s quite a different thing from the Adobe suite.
Equity and fairness toward buyers does not enter into it.
Adobe does not care at all about the “you”, the individual, personal user, and does not mind the outrage and offense taken at their seeming gouging..
Why? Because Photoshop and all that followed long ago became the industry standard for the commerce of editing and using images throughout the commercial and industrial ecology. It is they who are hooked, and will remain so throughout its life cycle..
Adobe foresaw, recognized that individual, personal users would ultimately adopt cheaper – even free – editors as they emerged, but knew also that the entrenchment of their product in the commercial world would not end overnight, whatever they might charge for it. Consider, for instance, what it would cost any commercial entity to switch to a different standard, and suddenly be using a different “currency” from their trading partners. So long as PS et al are the, ah, lengua franca of commercial use, there is money to be made.
The proof of this is blatantly in the fact that this model exists – they wouldn’t do it if it didn’t make sense for them.
(uh-oh; I’d best stop abusing this dead horse).
Yes, there are not many internet companies that have had a phrase of theirs become part of common parlance. I heard somehow the other day “can you just photoshop me in the picture?” who I’m sure knows what it means in this context (ie make me looker better than in reality!) but would have no clue where the phrase came from.
Yes, let’s stop kicking the dead pig!
Dan, thanks for the heads up regarding info etc… really intuitive…cheers,
Currentset up, firstly on a dedicated laptop I originally loaded on a program what I call ” my tweaker” it’s an old …really old uploading program called media impression… it came with a Kodak go pro copy camera, ….. it’s a really useful program as I’m able to plug in the card reader and it instantly “imports” the data on the card….. I then file that in an appropriate file ready to be played with later…. I then download that file to a flash drive by SanDisk….. this then goes onto the Samsung tablet ready for faffing with …. which basically at present is via snapseed like yourself….the flashdrive is then scrubbed ready for next time…once the photos are adjusted to my liking I save them onto a separate SanDisk external hard drive and if they are mega important to me I then back load the adjusted photos on the dedicated under a “revised” named file….
Dan, this sounds like a right faff, in reality, it’s all over an done with by the time my good lady has made a cuppa, it’s cooled a little and I’ve drunk it….why bother you may ask, well … like many I’ve lost photos in the past and again like many I’ve become somewhat paranoid about such things, but this way, I have the originals on the laptop, the revised on the tablet, also on the external drive, and the revised ones on the laptop as well,
As I’ve mentioned before, I also only use small capacity sd cards, which being cheap as chips means I can save them and keep them in month/year date as well,
It gives me a total of 4 standalone systems….
For me Snapseed is perfection, I’ve never bothered much before finding Snapseed, as I’ve always tried to get the photo I want out of the camera without any tweaking…. hence the shout out for your settings on the GX100, which have been a great help…..
I’ve little faith in the cloud system available as yet, as I feel the companies in question have the ability to hold me ransom in the future…. plus I can use some of my “parts” on any machine in the future….
Back to the cloud…… if people (in the uk) doubt me….. remember “freeserve”…..
Hope I’ve not bored your socks off…..
Best
Lynd
Lynd, good to see you. As you know, it was your questions about the GX100 that prompted this post, so thanks for the inspiration.
I think often the best system is the one we know, and that works. It doesn’t have to be the latest and greatest.
I have though about using SD cards as back ups, as they are so cheap these days. And very small of course! It’s still an option when my MacBook packs up and I’m using purely a ChromeBook (my current plan).
[…] with apps like Hipstamatic or Snapseed afterwards […]
[…] I can think of is it doesn’t give me images I like straight out of camera, I still need a little tweak in Snapseed. But it’s in good company here, alongside the Olympus and Sony also in this 4MP experiment, […]
[…] shoot with cameras that can either make pictures I love straight out of camera, or with a subtle 13 second tweak in Snapseed. My LightRoom subscription ended months ago and I haven’t thought twice about it. In the […]
[…] been delighted with it, and for the pictures not quite how I’d like straight out of camera, I use Snapseed to process b/w photos in about 13 seconds. I do also have Snapseed on my iPad, but to be honest the Xperia phone is more than good enough for […]
[…] The black and white images are pretty good straight out of camera, but I usually add a little extra via my standard Snapseed 13 second process. […]
[…] Nearly all of my photo processing was then transferred to Snapseed on my Xperia. […]
[…] LightRoom almost a year ago and have loved using first Hipstamatic, then Snapseed (with a typical 13 second processing time for b/w shots) ever […]
[…] There doesn’t appear to be any further customisation in this mode as with the Custom Colour, and so whilst it takes b/w images, I’m then likely to be giving them a little enhancement in Snapseed, as I do with my Ricohs and Sony DSC-L1. No hardship as it takes about 13 seconds per photo. […]
[…] So I tried converting that to b/w using my usual Snapseed process. […]
[…] b/w I use my usual 13 second Snapseed process, as with most other digital […]
[…] use my 11 year old MacBook Pro, and process with Snapseed, mostly on my phone. I also sometimes use my wife’s 10 year old HP laptop which I resurrected as […]